How to Learn Tailwind CSS
CSS/
When you are learning something new, it’s always hard to figure out a good place to start. It’s no different with learning Tailwind CSS from scratch.
Before you try finding the perfect tutorial or a course to buy, stop and take a step back. All you really need is the Tailwind CSS documentation. Let me show you how.
In this quick-start guide you will find out:
- The bare minimum you need to learn
- How to set up VS Code for working with Tailwind CSS
- How to create a Tailwind CSS project
Step 1 — Reading the Bare Minimum
The Tailwind CSS documentation is all you will need to learn. The Core Concepts section from the documentation is more than enough to understand Tailwind CSS. But here’s the most important bits as a start.
First, you should learn the philosophy behind Tailwind CSS by reading Utility-first Fundamentals.
Then, learn about modifier classes for styling various states, most importantly Hover, focus, and active.
Furthermore, learn how to make responsive styling with Tailwind CSS from Responsive Design.
Lastly, take a look how to use Tailwind CSS with components to avoid typing the same lists of classes over and over.
Step 2 — Setting up VS Code
Install Tailwind CSS IntelliSense by Tailwind Labs from VS Code plugin market place.
After you are done installing the plugin, you will see Tailwind CSS class name suggestions when adding a class to an element.
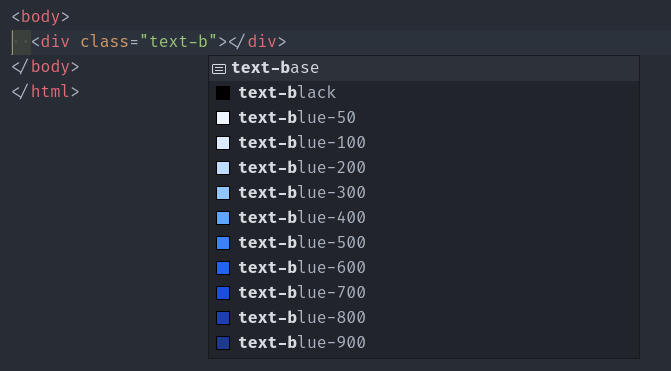
If you don’t see suggestions, you can bring them up yourself by pressing CTRL + Space while adding a class.
The plugin won’t work unless your project is set up to use Tailwind CSS — the tailwind.config.js file must exist. So don’t worry about autocomplete cluttering your screen in projects that don’t use Tailwind CSS.
Step 3 — Creating a Tailwind CSS Project
Follow these steps if you want to set up a new project with Tailwind CSS without a framework.
-
Create a project directory
mkdir tailwind-css && cd tailwind-css -
Install dependencies
npm install -D tailwindcss -
Initialize Tailwind CSS
npx tailwindcss init -
Adjust the
tailwind.config.jsfile/** @type {import('tailwindcss').Config} */ module.exports = { content: ['./*.{html}'], theme: { extend: {}, }, plugins: [], };Make sure that the
contentproperty contains the path to where your.htmlfiles are located. You can use the'./**/*.html'glob pattern, if you keep your HTML files inside nested folders. -
Create a
style.cssfile and import Tailwind CSS@tailwind base; @tailwind components; @tailwind utilities; -
Import the build stylesheet and add some Tailwind CSS classes to an HTML element
<html lang="en"> <head> <link rel="stylesheet" href="./build/style.css" /> </head> <body> <h1 class="text-3xl font-bold text-blue-700">Hello world!</h1> </body> </html> -
Run the following command to compile all your styles into the final build stylesheet
npx tailwindcss -i ./style.css -o ./build/style.css --watch
The command will keep running in your terminal. And if you make changes, it will rebuild your styles. You can press CTRL + C to stop the command from running.
If you want to set up Tailwind CSS using a framework, check out the official guides in the documentation.
Step 4 — Learn by Doing
Now that you have everything set up, work on your project and try to guess the class names using the Tailwind CSS IntelliSense plugin autocomplete feature.
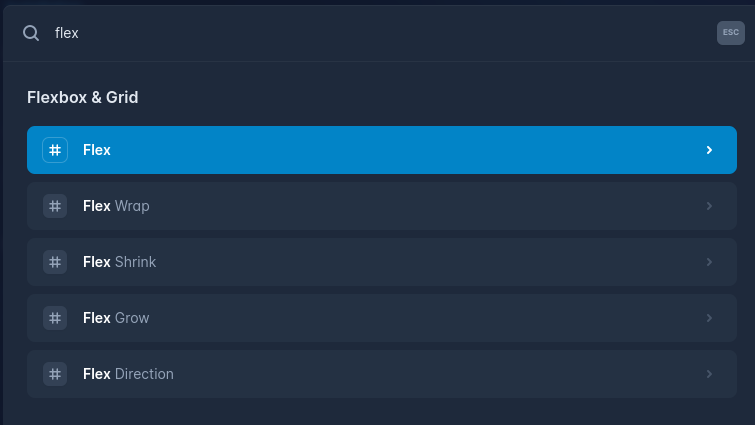
If you can’t figure out the class names, bring up the documentation and search for the CSS property that you want to add. You can press CTRL + K to instantly bring up the search.
You might also find this cheat sheet handy for an overview of all Tailwind CSS class names.